Part of the fun of setting up a dedicated sewing space is figuring out where to place your tools and furniture so that you get the most efficient layout without sacrificing comfort. An integral part of maintaining a healthy posture while you sew is taking chair ergonomics into consideration.
Why Is Sewing Posture So Important?
Why is it so important to maintain a healthy sewing posture? Apart from the obvious answer, “You’ll be so much more comfortable!” there are plenty of reasons to make sure you’re treating your body right.
Prevent Pain, or Worse, Injury
Hunching over your machine, bunching up your shoulders, chasing your foot pedal around as it slides away from you… in less than an hour, you’ll be able to feel that tightness and strain in your back, neck, shoulders… you might even notice some eye strain. Over time, these aches can lead to repetitive strain injuries like carpal tunnel, tennis elbow, and rotator cuff injuries and can exacerbate issues like arthritis.
Improve Productivity
Once you have yourself set up in the right chair at the right height, you’ll find you save a lot of time fooling around with readjusting your workspace and your body, trying to find a more comfortable position. When you start sewing ergonomically, you’ll find that you can sew for longer stretches and that you’re less sore overall.
Decrease Recovery Time
Most sewists know that once you hit that point of no return – the point at which your body says, “Nope! I’m done for today!” – it can take hours or even days to get those knots and strains worked out of your muscles. Sewing ergonomically eliminates that pesky downtime and allows you to keep doing what you love for longer periods of time, with considerably less discomfort.
Perfect Your Sewing Posture: How to Sit Healthily When Crafting
There are three big things to consider when your goal is ergonomic sewing. The table or cabinet, the lighting, and the chair. We’ve already talked about the many different surfaces you can set your sewing machine on… now it’s time to talk about where – and HOW – to sit.
A good ergonomic sewing chair is height-adjustable (people do come in all different heights, shapes, and sizes, after all) and offers good lower-back support. Arrow just so happens to make the #1 Rated Sewing Chair, and it’s available in 11 different solid and print upholstery options. But how should you use it?
How Do You Know if Your Posture is Bad for Your Back and Neck?
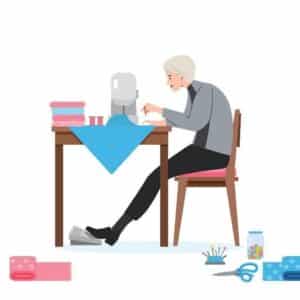
Take a look at this poor sewist:

She’s hunched over – you can almost feel the tightness in her back and neck. Her shoulders and wrists are going to get tired as she’s continually lifting her fabric up and over her sewing machine’s bed. She has back support, but it’s too high to help her in the lumbar region, and that pesky foot pedal keeps sliding away from her. How long do you think she’ll be able to keep this up before she says, “Enough! I need a masseuse!” and quits for the day?
This is an excellent example of what NOT to do. Our poor sewist is cruising toward a world of hurt, a possible trip to a chiropractor, and enough frustration to put a damper on her creative spark.
What’s the Right Way to Sit at Your Sewing Machine?
Start by listening to your gut… sort of. The first positioning measurement you need to take into account – your starting place – is at the base of your rib cage. The bottom of your rib cage must be even with the bed of your sewing machine
If you’re sewing on a regular table (dining room table, repurposed desk, etc.), the bed of your sewing machine will be higher than the tabletop. This is where having a height-adjustable chair comes in so handy. Regular dining chairs are designed to align the bottom of your rib cage with the tabletop. Putting a sewing machine on top of that table raises the necessary height of your rib cage by a couple of inches.
When your rib cage is aligned with the bed of your machine, some wonderful things naturally start to happen. You will find it easy to sit up with a straighter back. Your shoulders and elbows fall effortlessly into 90-degree angles, eliminating the need to hunch up your shoulders and strain your neck as you feed your fabric through your machine. If you’re on the petite side, you may find that you need to use a stool to raise your foot pedal so that you can maintain those 90-degree angles through your hips, knees, and ankles.
How Do I Check if My Spine Is in the Correct Posture?
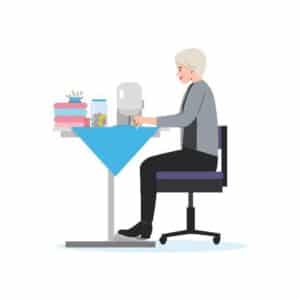
Take a look at our sewist with the right-height chair:

Once you have yourself positioned correctly with your back straight and centered over your sit bones, your head over your shoulders (not craning out in front of you), you will notice that your sewing sessions can go longer and longer! A word of caution, though – if you’re not used to using good posture or paying attention to ergonomics, it might take your body a little while to get used to your new, healthier posture.
How Long Does It Take for Good Posture to Stop Hurting?
If you’re not used to engaging your core muscles to sit upright, you may be a little fatigued while your body gets used to this new, healthier way to sit. Staying hydrated while you stitch will help with that, and make sure you take a break every 30 – 60 minutes and stretch! It might take a couple of months before your body adapts to the corrected posture and it stops hurting. The sooner you set up your ergonomic home studio, the easier the adaptation process would be.
Enjoy the Benefits of Comfortable Sewing
When you’re ready to start shopping for the right sewing chair for you, be sure to check out our selection of height-adjustable sewing chairs. Arrow’s chairs offer everything you need to get the right body position – adjustable height, lumbar support, sturdy base… plus, they have a secret storage compartment built into the seat! It’s the perfect place to stash whatever extras you need. You can check out the features and available additional fabrics storage here.
